SolidShip automatically prints your shipping labels to your computer's default printer.
In this article, we will show you how to access your computer's Control Panel to change the default printer and adjust your page setup.
What we'll cover:
Selecting a Default Printer
The process for selecting a default printer in your computer's Control Panel varies slightly depending on which version of Windows' operating system you're running.
Windows 7
1) Click on the Start menu.
2) Click on Device and Printers.

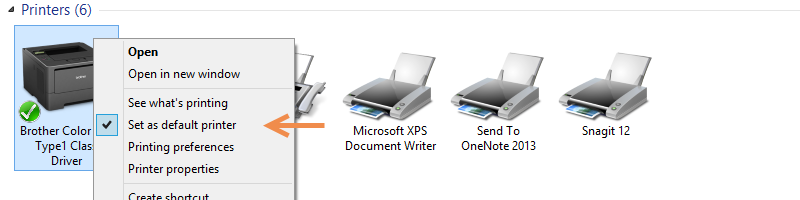
3) Right click on your label printer and select Set as default printer.

Windows 8.1 & Windows 10
1) For:
- Windows 8.1, click on the Search icon from the Windows screen.
![]()
- Windows 10, access Search from the task bar (next to the Start menu).
2) Search for and select Devices and Printers.

3) Right click on your label printer and select Set as default printer.
Printer Page Setup
If your labels aren't printing the way you want, you can adjust the page size and layout of your default printer through your computer's Control Panel.
As an example, thermal printers sometimes need to be updated to print on 4" x 6" labels.
When adding printers to Windows, sometimes the operating system automatically finds your printer. The default Windows print driver may not include all of the available printer options. If you feel like you are missing options, you may want to find the driver from the manufacturer and install it.
Printing preferences differ by printer and manufacturer. We provide common names for the settings. Your settings may have different names and locations.
Windows 7
1) Open the Start menu.
2) Click on Devices and Printers.
3) Right click on your default printer and click on Printing preferences.

4) In the pop-up, find the Paper Size setting and ensure it is correct.

5) Sometimes clients printing on 8 1/2 by 11 paper adjust the Multiple Page settings or Resizing Options to get the print to appear the size they want.
- Remember to account for standard page margins.

6) Make any other necessary adjustments. Click the OK button.
Windows 8.1 & Windows 10
1) For:
- Windows 8.1, click on the Search icon from the Windows screen.
- Windows 10, access Search from the task bar (next to the Start menu).
2) Search for and select Devices and Printers.
3) Right click on your default printer and click on Printing preferences.
4) In the pop-up, find the Paper Size setting and ensure it is correct.
5) Sometimes clients printing on 8 1/2 by 11 paper adjust the Multiple Page settings or Resizing Options to get the print to appear the size they want.
- Remember to account for standard page margins.

6) Make any other necessary adjustments. Click the OK button.
Related Articles
- NEW! Orders Manager: Scan and Ship and Order Tags
- Ship Now: Printing and Voiding Shipping Labels
- Ship Now: The Solid Commerce Shipping Client
- Order Returns, Refunds, and Cancellations on All Marketplaces (Legacy)
- Ship Now (Web Solution): Troubleshooting Viewing and Printing Errors or Issues
Comments
Article is closed for comments.